It started with a grow kit on our kitchen counter. One anniversary gift, a pink oyster mushroom block, and about ten days of misting — that was all it took to get us completely hooked. If you’ve ever been curious about growing your own mushrooms at home, we’re here to tell you it’s one of the most rewarding (and surprisingly simple) things you can do.
We’ve been growing gourmet mushrooms year-round here at Farm Lane Farms in Hyde Park, NY, and over the years we’ve learned what works, what doesn’t, and what we wish someone had told us on day one.
Why Grow Mushrooms at Home?
Fresh gourmet mushrooms from the grocery store are expensive — and they’re usually days old by the time they hit the shelf. When you grow your own, you’re harvesting minutes before cooking. The difference in flavor and texture is hard to overstate. A freshly harvested oyster mushroom has a silky, almost buttery quality that you just don’t get from a plastic clamshell that’s been in a truck for three days.
Beyond flavor, there’s something deeply satisfying about watching a cluster of mushrooms double in size overnight. It’s fast-feedback gardening. Most varieties go from pins to harvest in under two weeks.
The Best Varieties for Beginners
Not all mushrooms are created equal when it comes to ease of growing. Here’s what we recommend starting with:
Blue Oyster — The most forgiving variety we grow. They tolerate a wide range of temperatures and humidity levels. If you can keep them misted and out of direct sunlight, they’ll produce generous clusters. Great sautéed with garlic and butter.
Pink Oyster — These are the showstoppers. Bright coral-pink clusters that look almost tropical. They prefer warmer temps (65–80°F), so they’re perfect for kitchen growing in spring and summer. Mild, slightly seafood-like flavor that’s fantastic in tacos or stir-fry.
Golden Oyster — Another beautiful variety with a delicate, slightly nutty taste. A bit more sensitive to humidity than blue oysters, but still very beginner-friendly. They grow in dramatic cascading clusters.
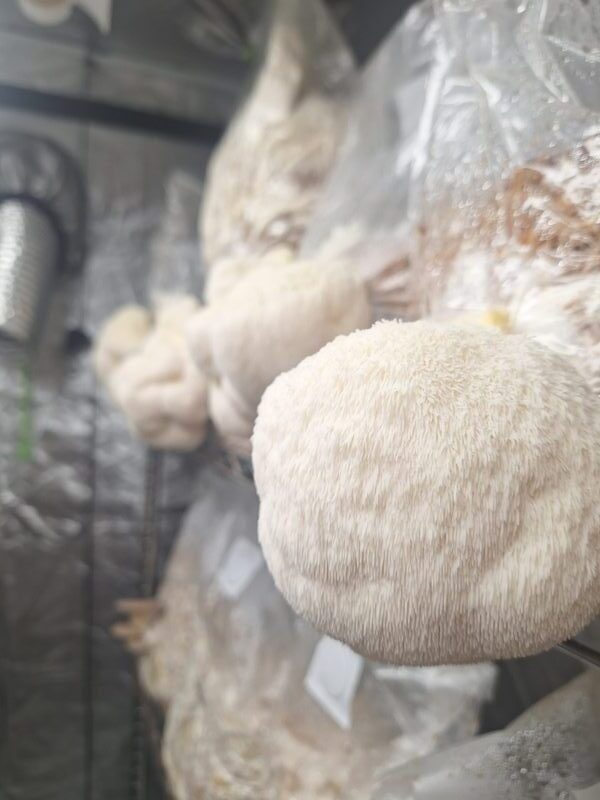
Lion’s Mane — This one looks like nothing else in the kitchen. White, shaggy, and almost coral-like. The flavor and texture when seared in a hot pan is remarkably similar to crab cake. It takes a little more attention to humidity, but it’s absolutely worth the effort.
King Trumpet — Thick, meaty stems with small caps. These are the steak of the mushroom world. Slice them lengthwise, score the surface, and sear them hard — they develop an incredible crust. They’re a bit slower to fruit than oysters, but the payoff is huge.
Starting with a Grow Kit
If you’ve never grown mushrooms before, a ready-to-fruit grow kit is the way to go. We sell these at our farmers market table and through our Etsy shop, and they’re specifically designed for beginners.
Here’s what you do:
1. Cut an X in the bag. Most kits come in a sealed bag of colonized substrate. You cut a small X-shaped slit to give the mushrooms a place to fruit from.
2. Mist 2–3 times a day. Mushrooms need humidity. A simple spray bottle with water is all you need. Mist the opening and the area around it. You’re not trying to soak it — just keep the surface damp.
3. Keep it in indirect light. A kitchen counter away from direct sun is perfect. Mushrooms don’t photosynthesize, but they do use light as a signal for which direction to grow.
4. Wait about 7–14 days. You’ll start seeing tiny pins forming at the slit within a few days. Once they appear, growth gets fast. Really fast. Check them twice a day toward the end — some varieties can go from perfect to slightly past-prime in 12 hours.
5. Harvest when the caps start to flatten. Don’t wait for them to fully flatten or curl upward. Harvest when the edges are still slightly curled down. Twist and pull the whole cluster off at the base.
Beyond the Kit: Liquid Culture
Once you’ve done a kit or two and caught the bug, the next step is liquid culture syringes. These contain live mycelium suspended in a nutrient solution, and you can use them to inoculate your own substrate — straw, hardwood sawdust, coffee grounds, or a mix.
This is where it gets really fun (and really cost-effective). A single syringe can inoculate multiple bags or buckets of substrate, giving you far more mushrooms per dollar than a pre-made kit.
We carry liquid cultures for all our main varieties. It’s a small step up in complexity, but if you can follow a recipe, you can do this.
Common Mistakes (We Made Them So You Don’t Have To)
Not enough humidity. This is the number one killer. If your mushrooms look dry, cracked, or stunted, they need more moisture. A humidity tent (even a loose plastic bag with holes) can make a huge difference.
Too much direct airflow. Mushrooms need fresh air exchange, but a fan blowing directly on your grow kit will dry it out fast. Indirect airflow is the goal — crack a window nearby rather than pointing a fan at your block.
Harvesting too late. Oyster mushrooms in particular go from perfect to dropping spores everywhere in a matter of hours. When the edges of the caps start to flatten, it’s go time. Don’t wait.
Giving up after the first flush. Most kits will produce 2–3 flushes (harvests). After the first harvest, soak the block in cold water for a few hours, then put it back in its spot and keep misting. The second flush is often just as generous as the first.
What to Do with Your Harvest
The beauty of fresh mushrooms is that they don’t need much. Here are our go-to preparations:
Simple sauté. Hot pan, butter or olive oil, sliced mushrooms, salt. Cook without moving them for 3–4 minutes until they develop a golden crust, then flip. Finish with a squeeze of lemon and fresh thyme. That’s it. That’s the whole recipe.
Mushroom toast. Take that sauté and pile it on sourdough with a smear of ricotta and a drizzle of good olive oil. Weekend breakfast doesn’t get better than this.
Stir-fry. Pink and golden oysters are incredible in stir-fry. High heat, sesame oil, soy sauce, ginger. They cook in about two minutes.
Lion’s mane crab cakes. Shred lion’s mane into chunks, sear until golden, then use it anywhere you’d use lump crab. Mix with mayo, Old Bay, breadcrumbs, and a squeeze of lemon. Pan-fry until crispy. People genuinely cannot tell the difference.
Growing your own food — even something as small as a mushroom block on your counter — changes your relationship with what you eat. You start paying attention. You start tasting the difference. And honestly, once you pull your first cluster of oyster mushrooms off a grow kit you inoculated yourself, you’ll understand why we turned an anniversary gift into a whole farm.
If you’re ready to get started, check out our grow kits and liquid cultures on our Etsy shop, or come find us at a Hudson Valley farmers market. We’re always happy to talk mushrooms.